Version: 2.5
Last Updated: Mei 2026
1. Introduction
The SMRP Automator is a Chrome Extension designed to streamline data entry for Dietetic modules within the Ministry of Health's SMRP Portal (MyHDW). It integrates directly with Google Sheets to eliminate manual double-entry, automates patient registration, and ensures data accuracy.
- Extreme Speed & Timeout Guard: Executes clinical data entry in under 3 seconds, with a 15-second safety timeout for slow-loading portals.
- Clinical Safety Guards: Includes a strict IC Match Guard and an "Unseen" patient bypass to prevent cross-patient data errors.
- Three-Way Integration: Supports Inpatient (
P.DALAM), Outpatient (P.LUAR), and Group Counseling (MNT BERKUMPULAN). - Audit Trail: Built-in history log to track your recent successful entries.
- Registration Automation: Auto-generates sequential Registration Numbers (e.g.,
DT10001).
2. Installation Guide
Before installing, please ensure you are logged into two Google accounts in your Chrome browser simultaneously:
- Your official Workspace email (
@moh.gov.my) - A personal Gmail account (e.g.,
yourname@gmail.com)
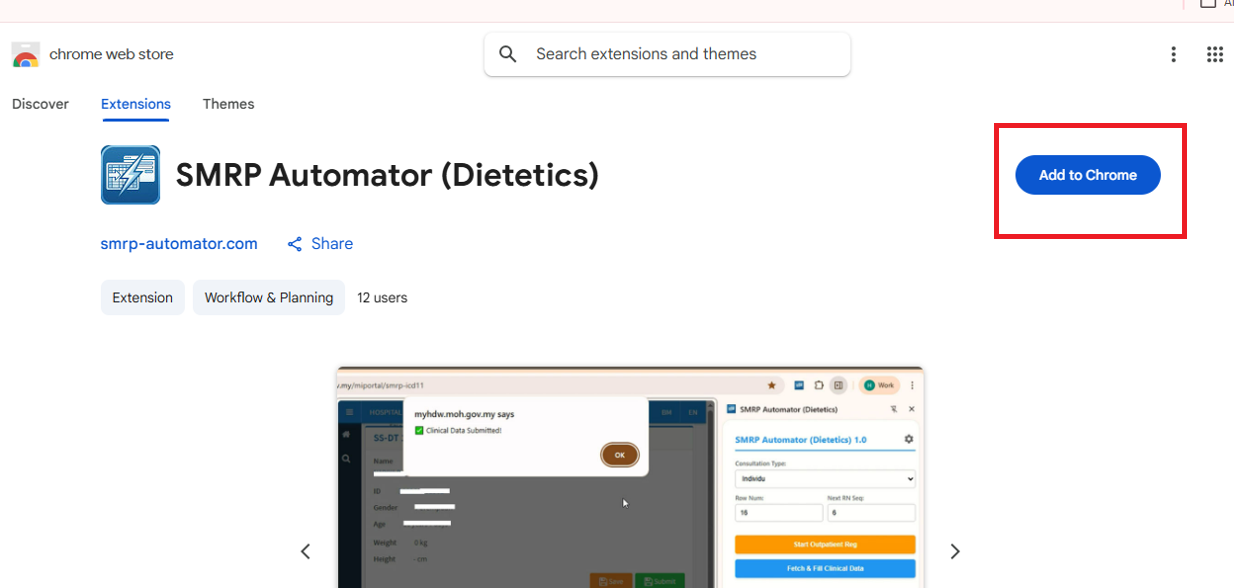
You can install the SMRP Automator directly from the Chrome Web Store.
Step 1: Download from Store
- Visit the Chrome Web Store Link.
- Click the blue "Add to Chrome" button.
- Confirm by clicking "Add extension" in the popup.
Step 2: Troubleshooting "Access Denied" Errors
"We are sorry, but you do not have access to Chrome Web Store."
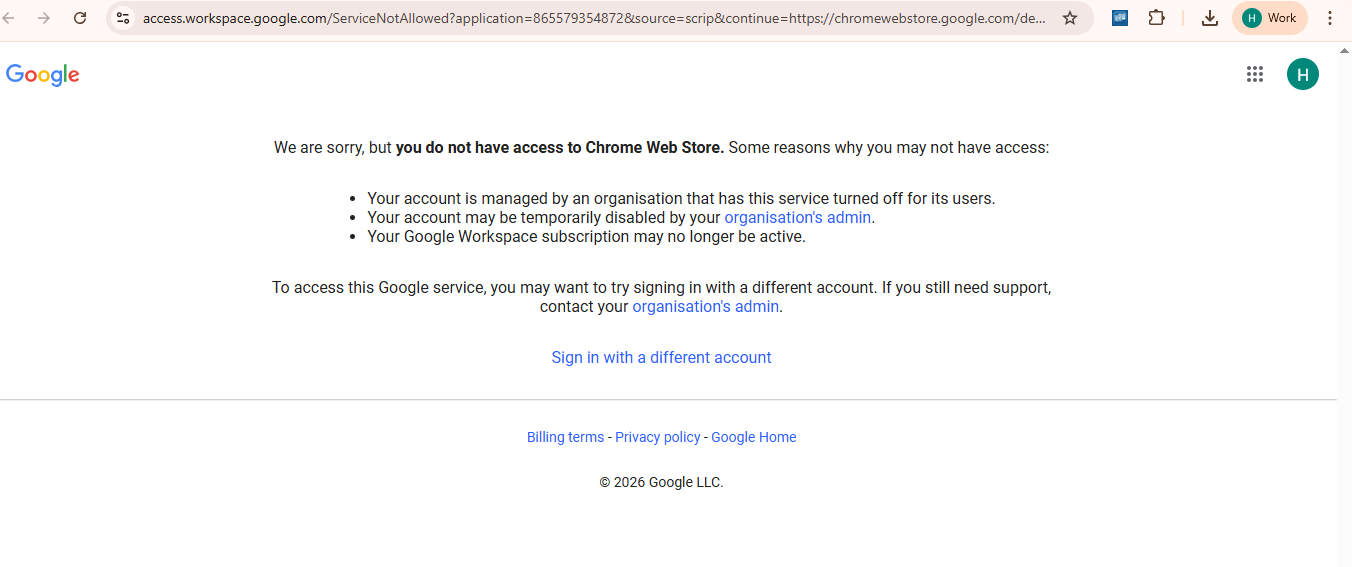
Why is this happening?
Your browser is currently signed in with your official Ministry of Health account (@moh.gov.my). The system administrator for MOH has blocked access to the Chrome Web Store for security reasons.
The Solution:
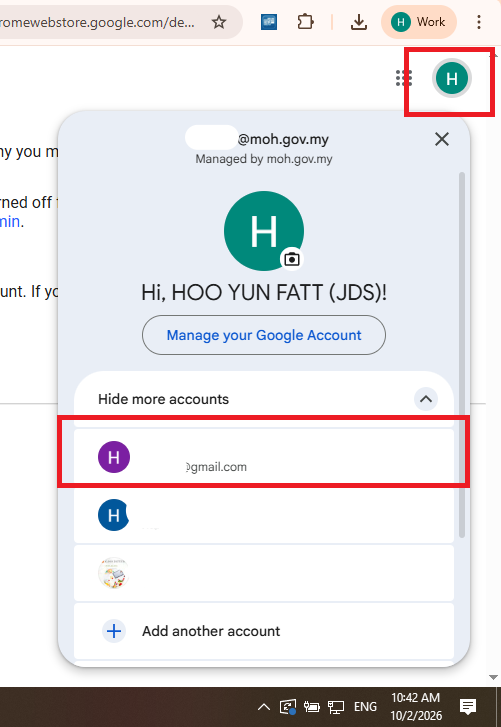
You must switch to your personal Gmail account to perform the download.
- Click your Profile Icon at the top right of the Chrome browser.
- Select your personal account.
- Once switched to the personal profile, reload the Web Store link.
- You will now be able to click "Add to Chrome".
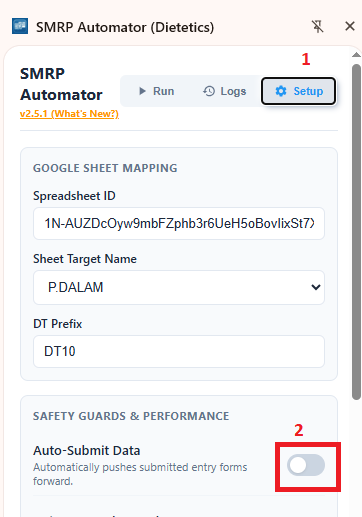
3. Initial Setup
- Open Setup: Click the Gear Icon inside the extension.
 Figure 4.0: Opening Settings
 - Link Spreadsheet: Paste your Spreadsheet ID from your Google Sheet URL (the string between /d/ and /edit) and select the Sheet Name.
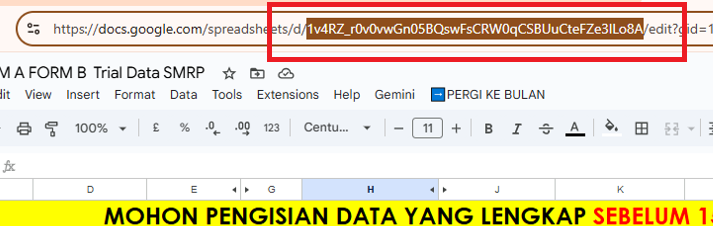 Figure 4.1: Finding the Google Sheet ID
 - Practitioner Credentials:
Enter your own IC Number or AHP Number into the "Dietitian IC/ AHP Number" field in the settings menu.
- RN Configuration (Registration Number):
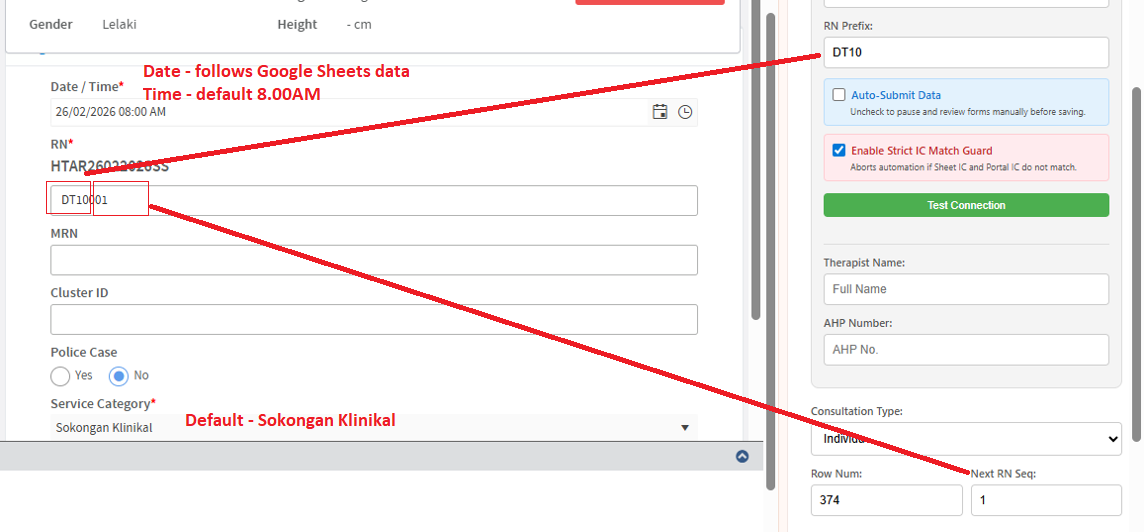
When you click "Add Clinical Support" to register a patient, the system generates a unique RN string. The extension automates the custom suffix part of this number.
Format Example:HTAR110126SSDT10001HTAR: Facility Location (Auto-generated by SMRP).110126: Date (Auto-generated by SMRP).SS: System Code (Fixed).DT10: DT Prefix (Configured in Extension Settings).001: Next RN Seq (Configured in Extension Settings).
To Configure:
- DT Prefix: Enter your department code (e.g.,
DT01,DT10,DT30). - Next RN Sequence: Enter the starting number for the day (e.g.,
001). This number auto-increments after every successful registration.
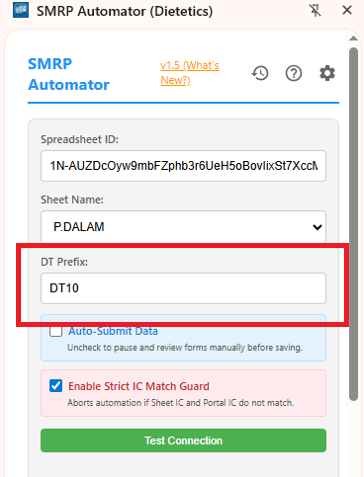
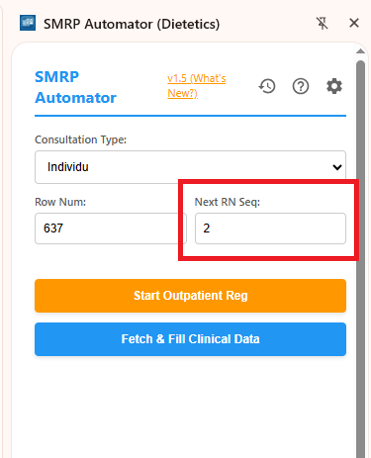 Figure 4.4: Configuring Registration Prefix and Sequence
 - Authorize (CRITICAL STEP): Click Test Connection. A Google sign-in window will appear. You MUST log in using your official Workspace Email (@moh.gov.my). Do NOT use the personal email that you used to download the extension.
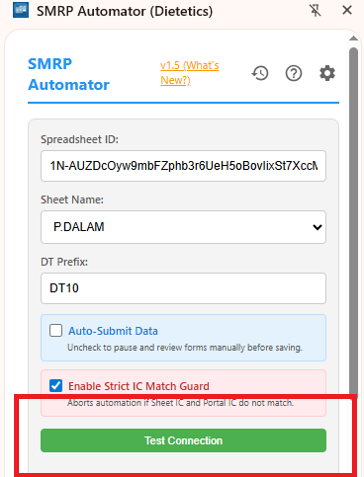
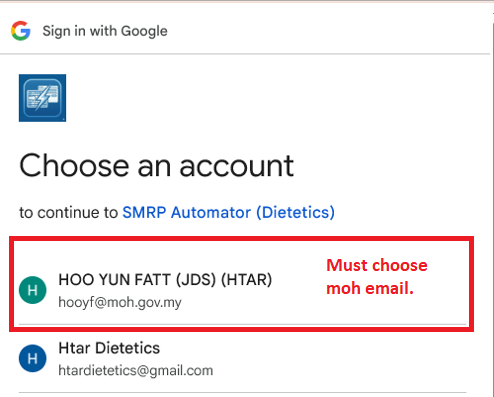
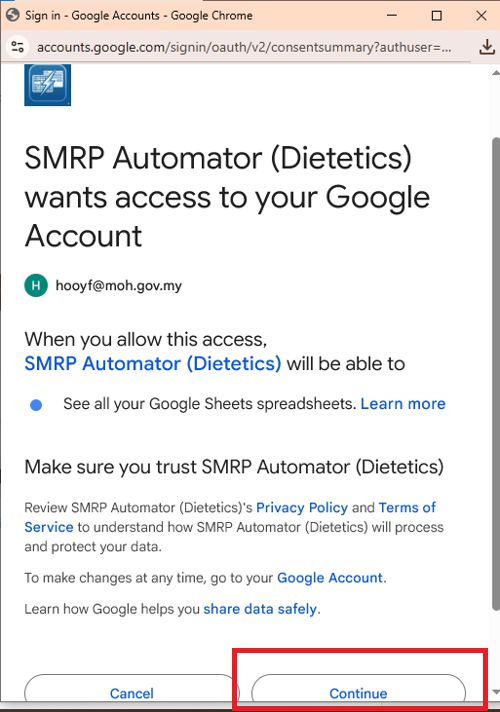 Figure 4.5: Successful Connection using Workspace Email
If your connection fails, it almost always means you accidentally selected the wrong email address during the sign-in prompt.
How to fix: You must click sign out button in the extension. Then, click "Test Connection" again and properly select your
@moh.gov.my email.
4. Workflows
Before You Begin: Preparation
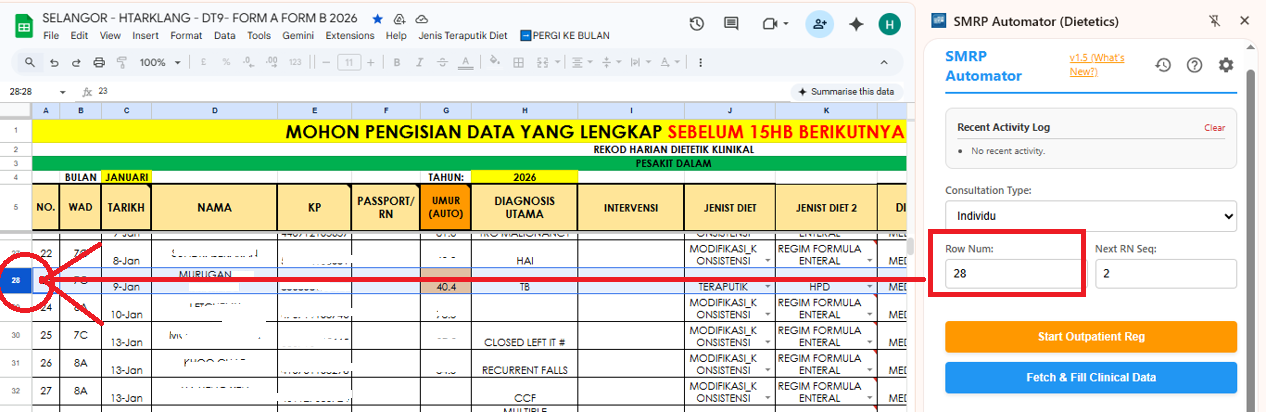
1. Locate Row Numbers: Look at your target Google Sheet layout, identify the row index containing the desired patient data on the far left edge (e.g., Row 4), and input that exact integer into the workspace field.
2. Launch Point: Access your SMRP account portal. You MUST open the base Patient Search Page before clicking any execution buttons; the extension will start by auto search for patient IC number if you trigger it from this specific page.
Workflow A: Add Clinical Support / RN Registration
Applies to new outpatient (P.LUAR) or group (MNT BERKUMPULAN) cases that require a valid sequential Registration Number (RN) generated beforehand.
- Open the extension and change the target sheet name to
P.LUARorMNT BERKUMPULAN. - Enter the target patient's Row Number.
- Click the green button: Add Clinical Support (RN Registration).
▶ How does the Automator works
The extension will automatically click "Add Clinical Support", fill in the Date (08:00 AM), generate the RN using your DT Prefix + Sequence, and submit the form.
-
Self-Healing RN Adjustments:
If the portal returns an error indicating the sequence code
already exists
(
rn already exists / telah wujud), the script automatically increments the sequence number (for example,DT10001 → DT10002) and resubmits without interrupting the automation cycle.
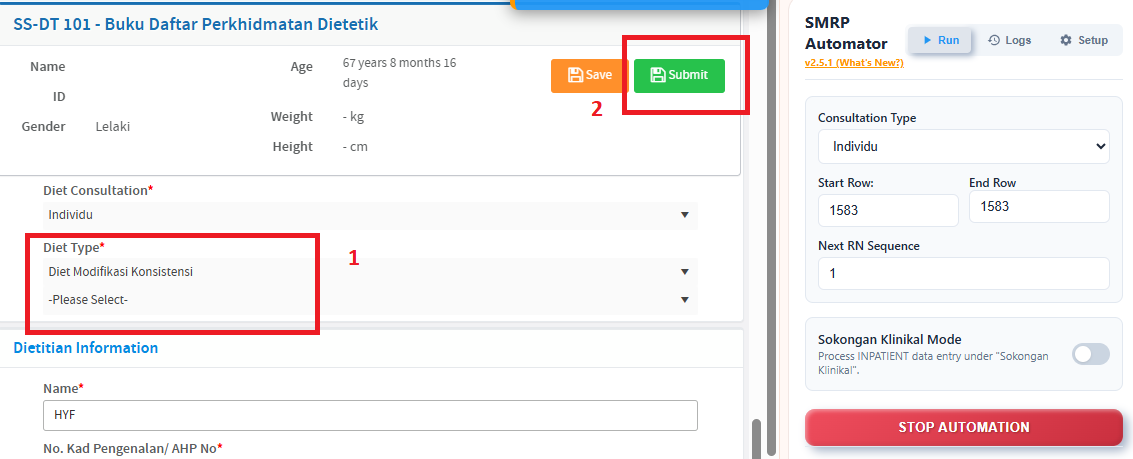
Workflow B: Clinical Form Data Entry Automation
Processes complete clinical fields entries directly into the SMRP website
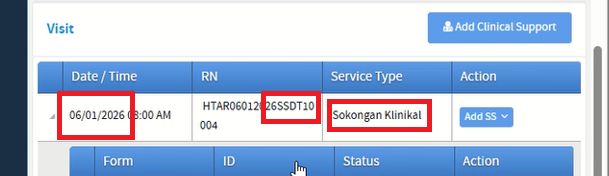
Scenario 1: Outpatient Modules (Individual Records)
- Verify your extension is targeting the
P.LUARsheet parameter and specify the row number. - Click the blue button: Fetch & Fill Clinical Data.
▶ How does the Automator work?
The extension scans for "Sokongan Klinikal" and "SSDT" in the RN list, finds the visit row matching your Sheet Date, verifies the patient's IC matches, opens the form, and fills out all clinical data instantly.

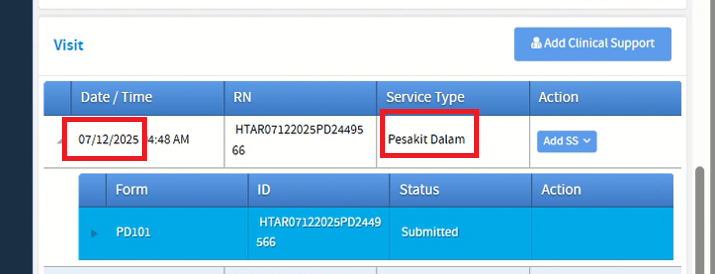
Scenario 2: Inpatient Modules (Ward Records)
- Change your configuration sheet target to
P.DALAMand enter the row index. - Click the blue button: Fetch & Fill Clinical Data.
▶ How does the Automator works
The extension checks Column Q to ensure the patient is not marked "Unseen". It then scans for "Pesakit Dalam" rows earlier than your admission date, verifies the patient's IC, and fills the clinical form.
Scenario 3: Group Counseling Modules (Classes Records)
- Change your configuration sheet target to
MNT BERKUMPULANand enter the row index. - Click the blue button: Fetch & Fill Clinical Data.
▶ How does the Automator works
The extension finds the correct date row, verifies the IC, auto-sets "Consultation Type" to "Kumpulan / Kelas", and fills the rest of the form automatically.
5. Handling Missing Diet Data (Non Selangor user)
Specific dietary information (Diet Type or Specific Diet) may be unavailable in your E-Pelaporan Google Sheet at the time of automated data entry. The Automator is equipped with an "Allow Incomplete" Bypass specifically for these two columns.
The 2 Missing Diet Columns
Depending on which sheet you are using, the Automator looks for the "Diet Type" (e.g., MODIFIKASI_KONSISTENSI, TERAPUTIK) and the specific sub-diet (e.g., Diet Lembut, Diet Diabetik) in the following locations:
| Sheet Name | Diet Type Column | Specific Diet Column |
|---|---|---|
| P.DALAM (Inpatient) | Column J | Column K |
| P.LUAR (Outpatient) | Column G | Column H |
| MNT BERKUMPULAN (Group) | Column F | Column G |
Please note that these columns are temporarily hidden in your E-Pelaporan Google Sheet. They will remain hidden while the Apps Script is under development and the dependent dropdown menus are being finalized.
How to Execute with Missing Data
- During "Fetch & Fill Clinical Data": The bot will successfully fill all available information and skip the blank Diet Type dropdowns. The bot will then pause, giving you a 60-second window to manually select the diet types and you need to click the 'Submit' button yourself.
- During "Add Clinical Support": Not affected.
6. Troubleshooting Guide
Navigation & Safety Errors
| Error / Symptom | Solution |
|---|---|
| Popup: "❌ IC Mismatch Guard!" | The IC number in your Google Sheet does not match the patient currently open in the MyHDW Portal. Verify you are on the correct patient's file. If the portal is genuinely missing the IC, you can bypass this by unchecking the Strict IC Match Guard in settings.
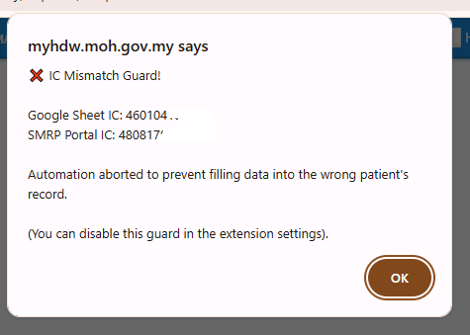
Figure 6.0: IC Mismatch Guard Alert
|
| Popup: "⏸️ The data in row is Unseen..." | Column Q in the P.DALAM sheet is marked as "True". The automator safely aborted to prevent filling out a blank form.
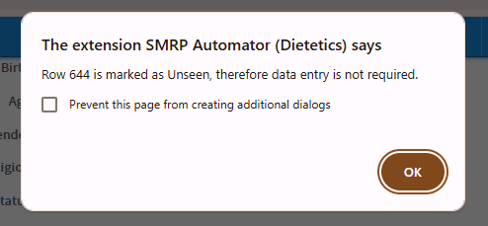
Figure 6.1: Unseen Patient Bypass Alert
|
| Popup: "No Inpatient Visit found earlier than ...... Check portal dates." |
1. Check Dates: Ensure Sheet date matches Portal. 2. Expand View: Scroll down in SMRP and change items per page to All or 20 or Toggle the "Enable Auto-Expand Grid" option under setting. 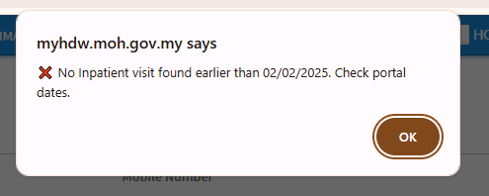
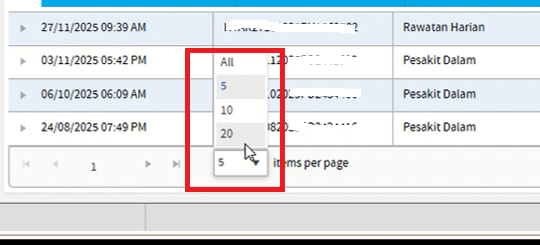
Figure 6.2: Expanding items per page in SMRP
3. Not Registered as Inpatient: If the error persists even after changing the items per page setting to 'All', it means the hospital registry didn't register this patient as 'Pesakit Dalam'. You are required to create an RN using the "Start Outpatient Registration" button. After creating the RN, toggle the "Inpatient: Data Entry Under "Sokongan Klinikal"" option, then click the "Fetch & Fill Clinical Data" button. 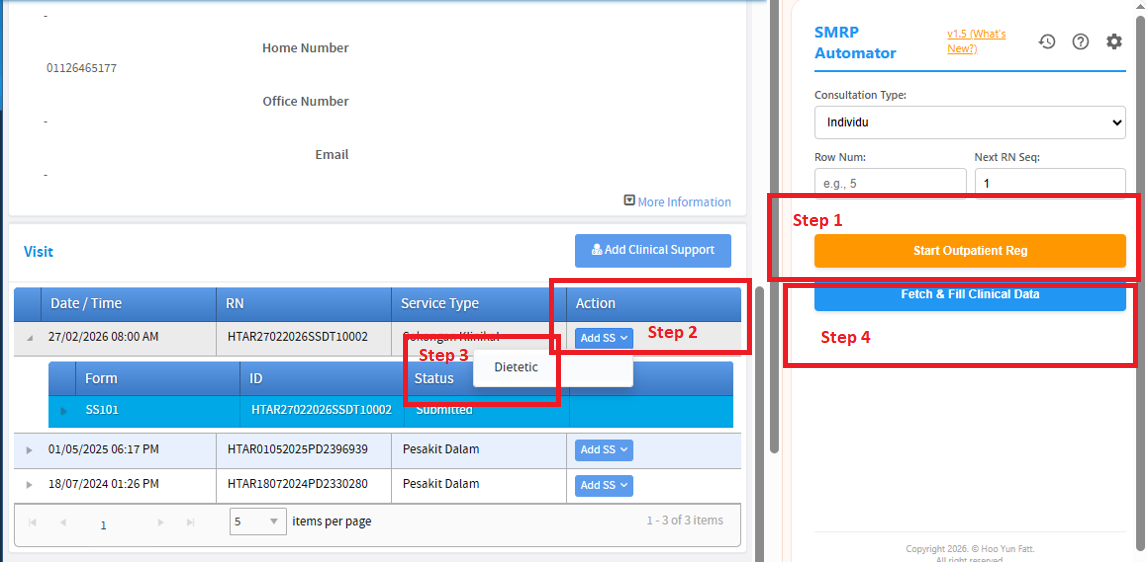
Figure 6.3: Manually registering and entering Dietetic page
|
| "⏳ Timeout: MyHDW Portal took too long..." | The portal took longer than 15 seconds to load the form. Refresh the portal page and try clicking the extension button again.

Figure 6.4: Timeout Safety Alert
|
Data & Connection Errors
| Error / Symptom | Solution |
|---|---|
| "Auth Failed" / Connection Failed |
You authorized the wrong Google account. Click Sign Out button in the extension, then click Test Connection and select your @moh.gov.my email.
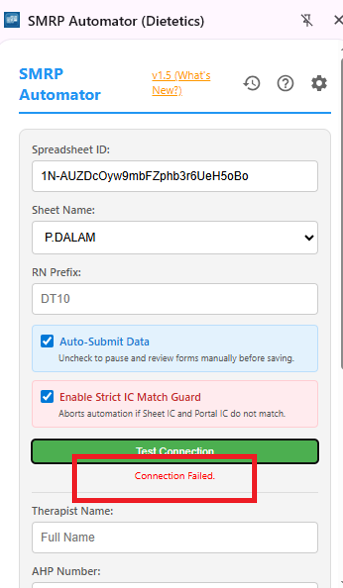
Figure 6.5: Connection Failed Error
|
7. View Modes
You can customize how the extension appears on your screen.
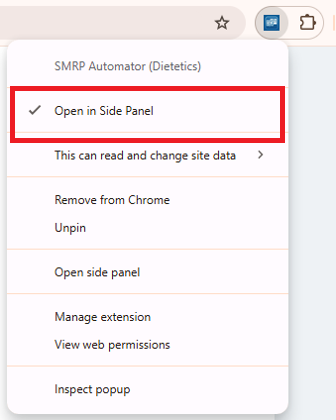
Option A: Sidebar Mode (Recommended)
Best for continuous data entry. The panel stays open while you navigate.
- Right-click the SMRP Automator icon.
- Check "Open in Side Panel".
- Click the icon to open the persistent side panel.
Option B: Popup Mode
Best for quick, single-use actions.
- Right-click the extension icon.
- Uncheck "Open in Side Panel".
- Click the icon to open as a floating window.
8. Features Settings
- Inpatient: Data Entry Under "Sokongan Klinikal": When checked, this setting modifies how inpatient data (P.DALAM) is processed. Instead of saving data under the default "Pesakit Dalam" pathway, the bot will process the data entry under the "Sokongan Klinikal" service pathway.
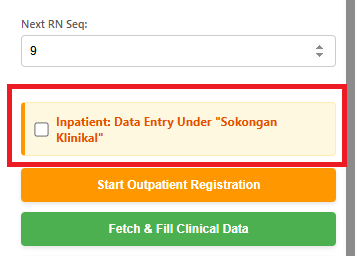 Figure 9.0: Inpatient: Data Entry Under "Sokongan Klinikal"
You can toggle the following automation features directly from the settings panel:
The extension will automatically click the final save/submit buttons for you. Uncheck this if you prefer the automation to pause right before submission, allowing you to manually review the filled form.
A critical safety feature that extracts the patient's IC from your Google Sheet and compares it to the IC displayed on the SMRP Portal. If they do not match, the automator instantly aborts to prevent entering data into the wrong patient's file.
Sets items per page view in Patient Summary Page to 'All' automatically.
9. Google Sheet Configuration
The automation is tailored according to the E-Pelaporan Google Sheet Layout. Based on the Sheet Name selected, the extension will read data from the following specific columns:
A. Inpatient Data (Sheet: P.DALAM)
- The extension reads data from Columns: C, E, G, H, J, K, L, M, O, Q
B. Outpatient Data (Sheet: P.LUAR)
- The extension reads data from Columns: B, C, E, F, G, H, I, K, N
C. Group Counseling Data (Sheet: MNT BERKUMPULAN)
- The extension reads data from Columns: B, D, E, F, H
10. Data Mapping Logic
The Automator uses a "Mapping Engine" to translate your Google Sheet terminology into the specific clinical categories required by the MyHDW portal.
A. Discipline Mapping
| Sheet Value (Malay) | Portal Category (English) |
|---|---|
| PEDIATRIK | Paediatrics |
| GENETIK / METABOLIK | Clinical Genetics |
| OBSTETRIK / GENEKOLOGI | Obstetrics & Gynaecology |
| PEMBEDAHAN AM | Surgery |
| ORAL SURGIKAL | Oral Maxillofacial Surgery |
| ORTOPEDIK | Orthopaedics |
| MEDIKAL | Medicine |
| HEMATOLOGI | Clinical Haematology |
| REHABILITASI | General Rehabilitation Medicine |
| HEPATOBILIARI | Hepatopancreatobiliary (HPB) Surgery |
| PLASTIK SURGIKAL | Plastic & Reconstructive Surgery |
| PSIKIATRIK | General Psychiatry |
| ORL | Otorhinolaryngology |
| ONKOLOGI | Surgical Oncology |
| RAWATAN RAPI | Adult Intensive Care |
| KECEMASAN | Emergency Medicine |
| RESPIRATORI | Respiratory Medicine |
| NEFROLOGI | Nephrology |
| UROLOGI | Urology |
| DERMATOLOGI | Dermatology |
| KARDIOLOGI | Cardiology |
| NEURO SURGIKAL | Neurosurgery |
| NEUROLOGI | Neurology |
| OFTALMOLOGI | Ophthalmology |
| GERIATRIK | Geriatric |
| Hepatology | Hepatology |
B. Diet Type Mapping
| Sheet Value | Portal Selection |
|---|---|
| MODIFIKASI_KONSISTENSI | Diet Modifikasi Konsistensi |
| TERAPUTIK | Diet Teraputik |
| PIAWAI | Diet Piawai |
C. Specific Diet Codes
Multiple codes can be entered in one cell (e.g., DD, LSD).
| Sheet Code | Full Clinical Diet Name |
|---|---|
| DD | Diet diabetik |
| LSD | Diet rendah garam |
| LCHOL | Diet rendah kolesterol |
| LFD | Diet rendah lemak |
| LCD | Diet rendah kalori |
| HCD | Diet tinggi kalori |
| LPD | Diet rendah protein |
| HPD | Diet tinggi protein |
| LPUR | Diet rendah purin |
| LK | Diet rendah potasium |
| HK | Diet tinggi potasium |
| LCOPPER | Diet rendah kuprum |
| LPO4 | Diet rendah fosfat |
| LVK | Diet rendah vitamin K |
| LFIBRE | Diet rendah serat |
| HFIBRE | Diet tinggi serat |
| LOXALATE | Diet rendah oksalat |
| IEM | Diet inborn error metabolisme (IEM) |
| KETO | Diet ketogenik |
| Bland | Diet bland |
| LSALICYLATE | Diet rendah salicylate |
| LACTOSEF | Diet tanpa laktose |
| GLUTENF | Diet tanpa gluten |
| TONSILECTOMY | Diet tonsilektomi |
| NEUTROPENIC | Diet neutropanik |
| UCAT | Diet ujian UCAT |
| REGIM FORMULA ENTERAL | Regim formula enteral |
| DIET CECAIR JERNIH | Diet cecair jernih |
| DIET MINUMAN BERKHASIAT | Diet minuman berkhasiat |
| DIET KISAR | Diet kisar |
| DIET BUBUR CAMPUR | Diet bubur campur |
| DIET CINCANG | Diet cincang |
| DIET LEMBUT | Diet lembut |
| DIET PUREE | Diet puree |
D. Referral Source: Outpatient Clinic
| Sheet Value | Portal Selection |
|---|---|
| OPD, Walk In | General Outpatient Department |
| AEC, ANT, CAPD, CKD, CRP, ERAS, FEES, GDM, GERIATRIK, HFC, IMD, MEC, MND, OBESE, ONCOLOGY, PDC, PPC, PRE IMD, PWS, RT, SARCOPENIA, SURGICAL, TRANSPLANT | Specialized Clinic |